SSL is now inevitable for web application that handles user data or any sensitive information. Now a days more and more web applications making their web traffic encripted. For some it's not just about the security, but also increases credibility of the website. SSL is also getting an importance is SEO as Google recently announced that they are giving small ranking boost to HTTPS websites. In this article we'll see how to setup SSL certificate in Elastic Load Balancer (ELB).
Getting SSL certificate
First thing first. To setup SSL in ELB, you should already have an SSL certificate with you. If not, you can purchase a certificate that suites your needs from any certificate authorities (CA). To get the certificate, you have to create and submit a Certificate Signing Request (CSR) to the provider. It is an encoded file that is generated from your server, which contains information about your domain and organization. You can easily create a CSR using openssl.
For creating CSR, first you need to have a rsa key. You can generate a private key using the following command.
openssl genrsa -out mydomain.key 2048
Now you can use this key to generate CSR.
openssl req -new -key mydomain.key -out mydomain.csr
This will ask you a few questions. Common name - which is the fully qualified domain name (Note that if you give the root domain, it will work with www. subdomain also), Organization - name of your organization, organization unit, City, State, Country code, etc. Once you provide all these details, it will generate a CSR file in PEM format. The content of the file will be between -----BEGIN CERTIFICATE REQUEST----- and -----END CERTIFICATE REQUEST-----. You can upload the CSR to the provider and they will provide the ssl certificate after verifying the domain ownership.
Preparing SSL certificate
Right now you should have three files (excluding CSR) in your hand, one private key file that we have generated from server, a public key and a certificate chain from the ssl provider. All keys and certificates should be in PEM format to use them in ELB. In most cases the files you have will be in pem format. pem fies are ASCII encoded, though not human readable. The certificate will begin with -----BEGIN CERTIFICATE----- and ends with -----END CERTIFICATE-----. If it's not, you can easily convert it to pem.
In case your private key is not in pem format, you can convert it using the following command.
$ openssl rsa -in old-private-key-file -outform PEM > new-private-key-file.key
Use the folling command to convert the public key and certificate chain recieved from CA.
$ openssl x509 -inform PEM -in public-key-file > public-key-file.pem
$ openssl x509 -inform PEM -in certificate-chain-file > certificate-chain.pem
This will generate the required pem files, which we can upload to ELB.
Uploading SSL
Now you are ready to upload the certificates in ELB. Login to the EC2 dashboard in AWS console and then select Load balancers from the left side menu. We need to configure ELB to accept HTTPS requests. To do this, navigate to the listeners tab, where you will see the listeners that are currently configured. Add HTTPS if it's not already enabled.

When enabling HTTPS in ELB we have two options. We can setup the secure both browser to ELB and ELB to the EC2 instance connections. If you don't want to configure the ssl in the server, you can enable https in load balancer only. In this case the connection from load balancer to the server won't be secure. As you can see in the above image, selecting HTTPS as load balancer protocol will enable secure connection to ELB. If you don't want secure connection between load balancer and ec2 instance, you can keep http as the instance protocol. Otherwise select https as instance protocol.
Elastic load balancer allows us to configure the ssl negotiation settings that we need. There are couple of predefined security policies, where "ELBSecurityPolicy-2014-01" is the latest. Or if you want you can customize the settings by clicking the Change link in Cipher column.
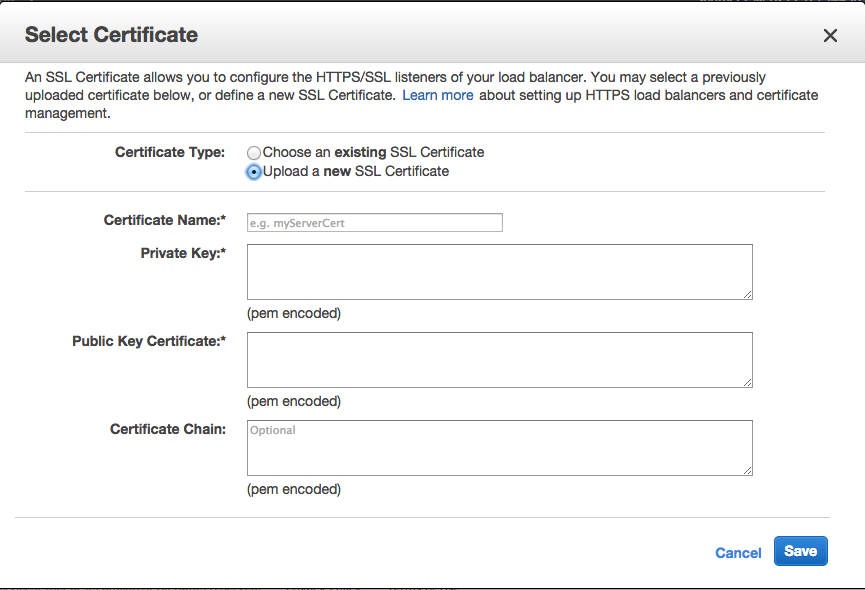
Next we need to upload our ssl certificate. Click on the Change link in SSL Certificate column and select "Upload new SSL Certificate".

Provide a name for the certificate that you are uploading and then enter private key, public key and the certificate chain in respective fields. Save the details and then SSL is ready in ELB.
Summary
Setting up HTTPS in Elastic Load Balancer is a farely easy task. But sometimes we face issues with non-compatible certificate formats and other stuffs. In this article I've tried to explain how to setup SSL certificate in Amazon Elastic Load Balancer. Hope this will help someone :)