In this article we will go through how to set up mysql replication in amazon EC2. Its a pretty basic introduction to replicaton, intended for beginners. We will go through how to start an Amzon instance, installing lamp and setting up replication.
What is replication
Replication is nothing but creating multiple copies of same database server or selected databases or only selected tables. Former is called as master and later is called as slave servers. We can have multiple master servers also. Replication can be used for high availability, scalability and also for improving application performance.MySQL supports one way replication where updates in the master servers will be sent to the slave servers, not in the reverse direction. If we need two way synchronization, we may need to go for clusters. Data in the master server will be updated by client applications. Our aim is to update this changes in our slave server too. For replication to work, we should enable binary logging in master server. The basic mechanism behind replication is transporting logs from master to slave. When ever a DML operation takes place in master server, this information will be added in binary log. Our slave servers will pull this informations and will update the slave databases.
Launching EC2 instances
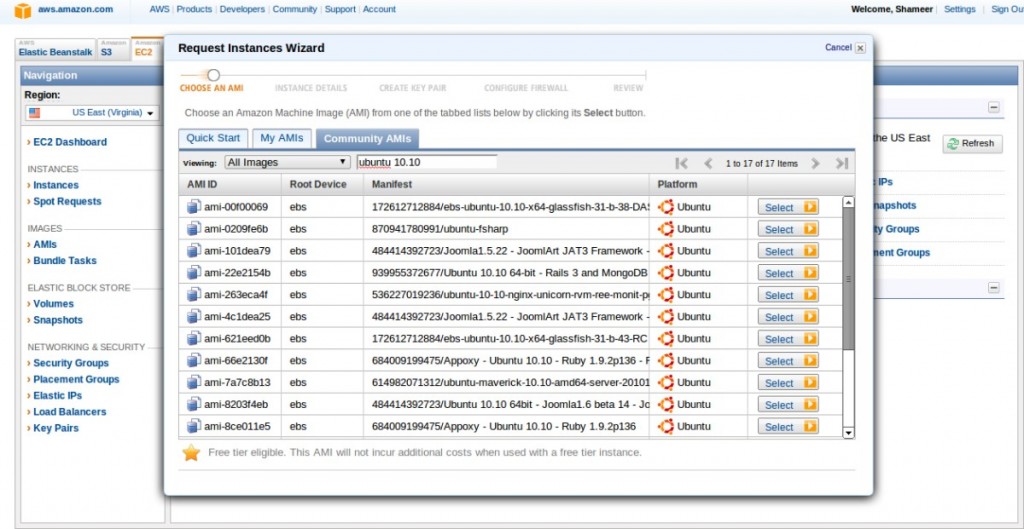
Before going to the replication we need to have two EC2 instances. I usually access aws through AWS management console. Sign in to the management console. Go to the EC2 tab and click on Launch instance button. From the community AMIs listing, select a fresh Ubuntu 10.10 image and start the instance.
Do the same to start one more instance. Connect to both instances using ssh in two terminals.
ssh -i your_key.pem ubuntu@ec2-67-202-7-105.compute-1.amazonaws.com
Now we need to install mysql in both servers. I love installing lamp than just mysql. Tasksel is a good utility to install many applications. So first intall tasksel
sudo apt-get install tasksel
Launch tasksel utility, select lamp and install. It will automatically install all the packages we needed. Now our environments are ready. Lets move to the replication part.
Important parameters for replication
server-id – This parameter is used in replication to uniquely identify master and slaves. Each server will have a unique value assigned to this parameter.
log_bin - This parameter specifies the base name of binary log file.
binlog_do_db – Specifies the name database(s) to be logged. We can specify multiple databases or leave this parameter blank to log all databases;
binlog_ignore_db – Specifies databases to be excluded from logging
skip-networking – This is another important parameter you should comment. Else your master server won't allow networking.
bind-address – The address to which you wish to bind your server. Leave it commented or give 0.0.0.0 (will accept connection requests from all addresses)Now lets move to the real part of replication. First of all we will configure the master server. I assume that your two servers are running in same region. Edit the mysql configuration file (my.cnf) uncomment if existing or add the following line
server-id= 1
Make sure skip-networking is commented.For bind-address either give the public IP of the first instance or comment it.Uncomment the following line or add it if not existing.
log_bin= /var/log/mysql/mysql-bin.log
Okay.. now our master server is almost ready. You can give binlog_do_db also if you wish to do replication only for selected databases.
binlog_do_db= my_database
Restart mysql and logon to the server.
ubuntu@ip-10-117-45-207:~$ sudo service mysql restartubuntu@ip-10-117-45-207:~$ mysql -u root -p
Create a replication user
Its recommended to create a separate user for mysql replication to which slaves can authenticate. Slaves will be connecting to the master using this user's credentials.
mysql> GRANT  REPLICATION SLAVE ON *.* TO 'repusername' IDENTIFIED BY 'password';
mysql> FLUSH PRIVILEGES;
mysql> FLUSH TABLES WITH READ LOCK;
mysql>SHOW MASTER STATUS;
+------------------+----------+--------------+------------------+| File             | Position | Binlog_Do_DB | Binlog_Ignore_DB |
+------------------+----------+--------------+------------------+| mysql-bin.000019 |      106 |              |                  |
+------------------+----------+--------------+------------------+
We have almost finished configuring our master server. Now connect to the second instance in another terminal. Edit the my.cnf file to make the following changes.
Server-id= 2log_bin= /var/log/mysql/mysql-bin.log (Not mandatory)
Restart mysql here also
ubuntu@domU-12-31-39-04-55-CF:~$ sudo service mysql restart
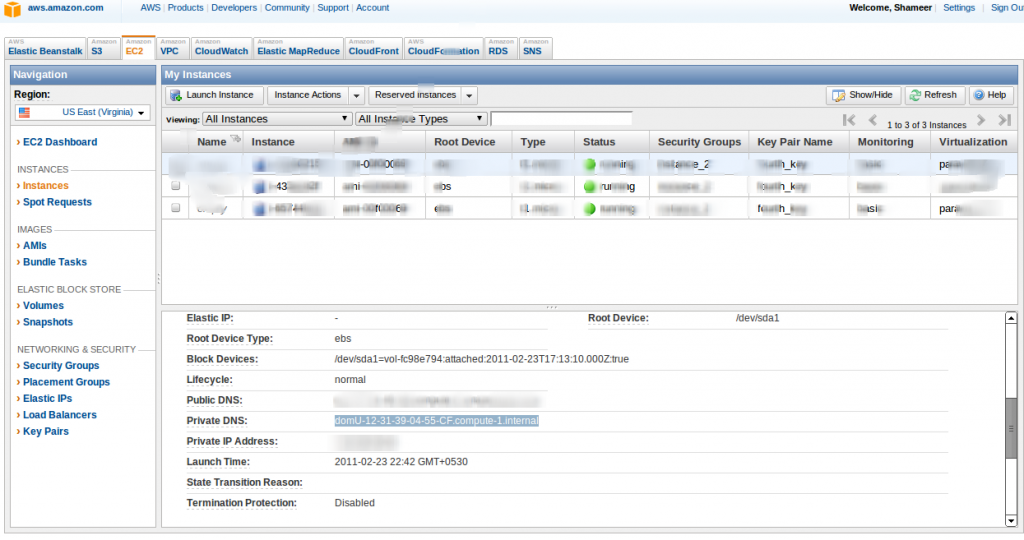
We need to inform our slave server the details of master server like host name, replication username and password,etc. Here we will be using amazon private dns as master host name. See the screen shot below to locate your private dns . Other things that slave server need is master log file name and log position, which we have obtained by entering show master status on master server. Now we can connect slave with the master by issuing the following command. 
mysql> CHANGE MASTER TOMASTER_HOST = 'domU-12-31-39-04-55-CF.compute-1.internal'
        MASTER_USER ='repusername',
        MASTER_PASSWORD='password',
        MASTER_LOG_FILE = 'mysql-bin.000019',
        MASTER_LOG_POS =106;
        mysql> START SLAVE;
Now in the master host run the following command to release the lock
mysql> UNLOCK TABLES;
Now lets create a database and a table in master to test the replication.
mysql> CREATE DATABASE replication_test;
on the slave server when you issue the show databases command, it will list our new database too. Likewise each and every change that we make in master will be ported into the slave also.
Summary
In this article I have tried to demonstrate things as simple as possible. At any point If you didn't get it, or I am mistaken, please feel free to add them as comment.